Friday, March 30, 2012

Rainbow Hearts!

I don't know if there are any other moms out there who have a fascination with their cute little baby's tiny bum.  I imagine I'm not alone since they make pants for babies with the word Cutie across the butt!  I just thought my daughter's little bum looked adorable in her rainbow striped jeans and I had to take some pictures!  Then, of course, I had to scrapbook said pictures.  (I am glad I did too because the pants don't fit anymore...sad!)  I didn't want to title the page "Cute Bum" or anything else that might embarrass her in the future (I am aware that someday she'll be a sullen teenager, dislike!)  So here is my non-embarrassing layout!


Only I know what that title refers to (well, now you do too!)  I converted the photos to black and white and colorized just the rainbow stripes to add subtle focus and to hide the distracting background.  I did that using an app called Color Splash Studio that was $1.99 on my Mac.  I am very pleased with the program and don't feel like I need to spend the time to learn Photoshop yet because I have Color Splash!

This idea was one I scraplifted and made my own.  The original idea came from Scrapbooks Etc. magazine.  Here is the original and the link  http://www.scrapbooksetc.com/theme/family/children/girl-scrapbook-pages/?page=18:
                         

In my layout most of the elements are in the same place, but I chose to use white background paper to really make the ribbon on the hear and the pictures stand out.  The paper I chose has a very subtle patter on it that you can only see in the right light.


Because of this fun pattern I left a lot of white space on the layout.  The pattern of hearts goes along with my "theme" of love as well as my title (which is done with two different kinds of alphabet stickers.)


I added a colorful striped strip (Bella Blvd paper) and some cute buttons to the left side of the layout.  It almost feels to me that the two POPS of color act as a frame to draw your eyes to the black and white photos.


The best part of the layout (besides the cute bum!) is the ribbon heart!  I made that by cutting a heart out of card stock-in this case black-and laying strips of ribbon across.  I didn't worry about lining the ribbon up with the edges at all.  I just let it hang over the edge.  After I was all done glueing them down I turned the heart over and used the card stock as a guide to trim the ribbon.  The words tying on the heart are simply strips of photo paper that I hand wrote words on with a Le Plume marker.

So there you have it.  Another colorful, fun layout featuring my adorable daughter!  Now I'm off to work on another!  Thanks for stopping by!

Thursday, March 29, 2012

Hooray Chevrons!

Because of my maaannnnyyyy hours on Pinterest and reading the blogs of other scrapbookers, I see a lot of new scrapbook trends that I just have to try.  Overall I would like to say that my style is quite eclectic, and I am not opposed to trying something typically out of my comfort zone.  I am all about "finding myself as an artist."  As a rule, if it makes me happy then it was a success!  And chevrons...well they make me happy!  They are just so...fun!  And since these pictures of my daughter were so fun, they had to be paired with a fun technique:


Scrapbook trends tend to follow the fashion world, and you may have seen these zig zag patterns on clothing, home decor and other places as well.  Often you see the chevron pattern in one color across the page, but I happened to see a layout similar to this one and had to try the technique.  Where did I see it?  Pinterest of course!  But I traced it back to the original source so here is the original layout and the link:


What I liked about this layout was the open space and how the focus was on the technique. I also liked the way this scrapbooker used many different patterns in a random fashion.  So I had to try it for myself. 


I started with 1 inch long parallelograms (thanks Maureen!) and a handful of papers that worked well with the coral colored pattern on my daughter's shirt.  That in itself was a challenge!  I adhered the shapes to the paper as I cut them because they were so small and I didn't want to do the work twice!  I just made sure one edge lined up with the next.


 When I was done, because I had hand-traced and cut the pieces (rather than using a punch) they did not line up perfectly at the edge. So to fix that problem I trimmed the light brown card stock and matted it.  Then I adhered my pictures, ran a piece of sheer brown ribbon across and added a heart charm.   My title is done in Amy Tangerine Thickers.


And that is all!  Thanks for reading.  Leave a comment to say hello!  See you next time!

Wednesday, March 28, 2012

My little nerd...

You have babies so you can dress them up and take silly pictures of them, right?!  Please tell me I'm not alone in thinking that children are THE most amusing things on God's green Earth?!  I know I'm not alone, because otherwise Anne Geddes never would have had a market for her crazy baby photos.  But why buy an Anne Geddes when I have my own cute baby?!


So one day I was sitting on the kitchen floor with my daughter playing with a wooden spoon while my husband made dinner (isn't he sweet?!).  I decided that my daughter wearing my glasses was probably the funniest thing, well, since the last crazy photo op (and if you read my blog you'll see plenty!)   So I had hubby snap some pictures.  I was so happy with how they turned out, and I really loved how her feet looked like monkey feet in the first photo!  Since the pictures were so adorable, I felt they deserved special treatment and I thought long and hard about how to present them on a layout.


During one of my many visits to Pinterest, I had seen a layout from the BasicGrey blog I just HAD to try myself.  It was created by Kelly Goree and posted on the Basic Grey blog on January 29, 2012.  Here is her layout and the link:


I just loved the way the bottom third of her page was three-dimensional and looked like a quilt.  Obviously the colors she chose for her awesome layout would not work for mine, nor would the waves.  But I took the basic structure of this layout and made it my own.

My pink striped background paper, some older stuff from Stampin' Up, just screamed NERD to me.  I used one sheet of the striped paper to create my top and bottom portions and used a Fiskars edge punch to make it girly.  I chose two neutral colors to go along with it because my other patterns were so busy.  I just love the way pink and brown look together, so I chose a nice chocolatey brown to lay the striped portions on.  

Next I worked on the "quilt."  It needed to be matted so the patterns didn't clash, so I chose an off-white.  I cut 6 circles from each pattern and just folded the edges all down.  I paid attention to the measurement of the square part I'd be glueing to the off-white to ensure even spacing.  It took some adjusting but I think it paid off in the end!


I thought my title needed to be simple since the page had so much going on, so I traced some chipboard letters I had onto the off-white paper.  But I thought that was boring by itself, so I added some math equations to go with the nerd theme.


A handful of flowers in the upper right corner and some stickers finish off the page.  And there you have my little nerd!  Thanks for stopping by!

Tuesday, March 27, 2012

Simple and Sweet

I am THAT mom.  The one who has a camera in her hands at all times.  The one who sees her daughter doing something cute and says, "make her keep doing it so I can get the camera!"  Partly it is because I have wanted to be a mom my whole life and EVERYTHING my daughter does is amazing.  Partly it's because I (gasp!) love to scrapbook and wouldn't love it as much without the pictures!


That being said, sometimes there is no significance to a page other than that I liked the pictures and HAD to scrap them.  Or maybe that I had a neat embellishment I just HAD to use.  In this case, it was both!


I took these pictures on the first warm day of Spring, on a day I had to change my daughter out of pants and put on a skirt because it was so nice.  In both of these shots she was sticking out her tongue, even though they were taken an hour or so apart.  So of course I thought of the neat title I had that matched the colors and the attitude!  Doodlebug makes them and they are called Headlines.  They come in all different varieties, but I think Spunky fit well here!


Because the colors in Grace's shirt were red, white and blue I went right to the 4th of July section at the scrapbooking store.  The patterned paper is by Adornit and has near red swirls.  Then I chose some Tim Holtz cardstock.  I tore the edges of each frame using a ruler to give it a distressed look.  Then I clipped on 2 star clips and added some stars that I punched, inked and stamped.


My only other need was for journaling.  I cut 2 photo corners with my Sizzix and placed them opposite one another then simply write the journaling inside with a white pen.


Sometimes you need a simple project to give you a sense of accomplishment.  Sometimes you can't find any more than 10 minutes in a day and want to get something done!  Try this simple layout next time you want to quickly scrap some fun pics!  

Monday, March 26, 2012

Gus!

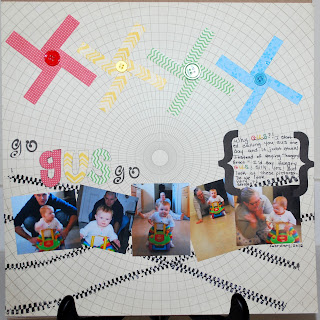
My daughter has a new nickname every week.  It was Grandpa for a while, but then she got some teeth.  My husband has called her Ducky since the day she was born.  And a former student who couldn't pronounce my name and called me Mrs. Muffin is where "Mini-Muffin" came from.  But Gus was all mine.  Gus is close to Grace (same G sound, same s sound at the end) and it makes me think of pal or buddy.  I would say, "You're a hungry Gus" when she was shoveling food in her mouth.  Or, aren't you a sleepy Gus when she was rubbing her eyes.  Then it became just Gus.  Maybe she'll hate me when she's older for it, but I think it is silly and cute!


So when I saw how great these pictures turned out I knew the title right away!  Sometimes you want to scrapbook some pictures just because you have a fun story to tell.  And I didn't even tell the story behind the photos, because they speak for themselves!  Instead I used the photos as a vehicle (haha) to tell the story of the nickname.


When I planned this page I looked for things that would convey a feeling of movement since we were rolling her on her car in the photos.  The first thing I chose was this awesome background paper.  Studio Calico is the company who makes it and it is called Plano.  It is no longer manufactured but I was able to find it online by doing a google search.  

The next thing I did to show movement was to create these pinwheels.  They were quite simple to make.  All I needed were 4 strips of paper the same size and one button.  I chose these colors for two reasons.  First, they match the car.  Second, they are traffic light colors.  I also chose patterns that convey a sense of movement like the polka dots and the zig zags.


My favorite part of this page is the tire tracks.  I made them using a dollar store monster truck.  At first I was going to roll them in brown paint, but then I came up with an even better idea!  VersaMark and black embossing powder!  It gives them a raised, "burn rubber" kind of look.  I was having so much fun I wanted to roll them all over the page but I restrained myself!  A little trick: only dip the front wheels in the glue.


My final touches were the title which is done in the same papers as the pinwheels with the edges inked so they look "dirty" as well as black embossing powder.  I staggered the parts of the title, again for the illusion of movement.  The pictures are placed at angles, again, for movement.  And last, my journaling block, which balances out the title perfectly.  The word Gus is done in colors to match the word in the title.  The brackets draw your attention to it and also draw the eyes downward to the pictures.


And that, my friends, is the "science" behind this particular page!  It was LOTS of fun for create.  I hope I've inspired you to look at one of your child's toys in a new light.  Marbles can be dipped in paint and rolled on the page.  Plastic animals or dines can stamp tracks across the paper.  Shape sorter pieces can be dipped in paint and make different shaped backgrounds.  Leave a comment below with any other cool ideas for how to scrapbook with toys!    

Sunday, March 25, 2012

My Lucky Charm

I spent 12 glorious hours yesterday in what I like to call "Mommy's Disneyland."  I was at a crop in my favorite scrapbooking store.  I had plenty of projects to keep me occupied, and every time I said "This page needs..." there it was hanging from a peg or on a shelf!  I am so lucky to have a wonderful husband who supports my need for "me time" and to have a beautiful daughter whose pictures I love to scrapbook!  I look forward to these fun mini-escapes once a month!


The first page I worked on yesterday is whimsical and fun, which is how we roll in my house!  Although I used St. Patrick's Day paper, these pictures have nothing at all to do with St. Patrick's Day except that they happened to be taken on March 17.  My daughter was exploring and getting into trouble as usual when I saw an awesome photo opportunity.  I broke out the camera, always close at hand, because the setting sun was streaming in the window and hitting the floor just right so that it looked like my daughter was unearthing buried treasure from the filing cabinet rather than ripping apart mommy's notebooks.  Later, when I looked at the photos the title came to me as I thought about how I constantly thwart her efforts and take away  whatever it is she's into!  Thus was born, "Always After Me Lucky Charms:"


The background paper and the strip in the center are from the same sheet of Reminisce paper.  I loved how lively the paper was!  The two narrow strips of green going vertically are an almost crepe paper like ribbon that the store was selling by the yard.  


Upon the advice of a fellow crafter I matted the strip of smaller photos at the bottom on solid green.  I tried them without the matting but it looked like they were just floating in space.  One important rule of scrapbooking: always ground your elements to the page!


My focal photo is matted on the same solid green and accented by a shamrock covered in green glitter glue to draw attention to it.


I had a difficult time with my title because I wanted to incorporate this neat printable I got online:


             http://sprik.blogspot.com


Because I was at a crop and not at home with my computer, I was committed to the size I had already printed out.  I searched high and low for just the right font and finally settled on a Die-Namics die and some black card stock.  The charms were a WOW find; I was so excited to find such a perfect addition to the page.  They are a Tim Holtz product and they come with pain charms, alphabet stickers, and epoxy stickers to place on top.


I had so much fun with this layout!  It is one of those everyday moments that take your breath away.  There are lots of them around here with our little Grace!  I think it is often more fun to scrap the every day pictures than the "important event" pictures.  I hope I have inspired you to pick up the camera today and photograph a bit of the everyday and realize just how special those moments can be!

Friday, March 23, 2012

Firework!

When my daughter was about 4 months old I began taking her to a local music class that I heard about through the moms group I am a part of.  Back then she was just a passive observer, but it was (and still is) a great experience for both of us.  


So one day in the fall we were at our music class and the instructor tells the parents to free-dance with our babies.  Here I am, 4 months post-birth and mid-post-partum depression, feeling dumb, just tapping my feet and praying it was a short song!  The song she played was one I had never heard before (because I lived under a rock I guess!) and I started to tear up listening to the words.  One particular line says, "If you only knew what the future holds; after a hurricane comes a rainbow."  I thought about how amazing it was that I held the future in my arms, and I had to do everything I could to keep from crying.


Later, I searched YouTube for the song and realized that I was blown away by a Katy Perry song.  Katy Perry?!  "I kissed a girl" Katy Perry?!  I don't care who sings it, though.  It means something very special to me.  I dance with my daughter to the song all the time and it never loses its impact!  So of course, I needed to scrap all those emotions and show just how I felt in a visual way:


This page took some time!  The first thing I did was use my circle cutter to cut a circle out of heavy card stock.  I then cut a smaller circle out of the center of that one.  I went through my ribbon collection and cut a short length of each color I wanted to use then layer them out in ROYGBV order.  I wrapped one piece at a time around the card stock circle and secured it with double sided tape before putting 2 stitches in each.


The lettering was done with embossing powder on a transparency.  I am not entirely thrilled with how it looks on the transparency, but I usually don't like to change a layout that I already deemed "finished."  Why?  Because each new layout shows my growth as an artist and I am proud of my "learning moments"!


My next step in this layout was to tint the picture 6 times to go along with the part of the song that says "let your colors burst."  I did this using Picasa, a free photo editing program available through Google. I then placed a matching circle beneath each tinted photo and ran a straight line of stitching through the center.


My final step was to add journaling.  I felt it needed to be handwritten because it is a letter to my daughter, and I used a silver metallic pen to make it pop.  The journaling reads:

One morning in October we were in music class when the instructor put on a song I had never heard before.  I listened to the words as I spun around with you in my arms and I was suddenly STRUCK with the enormity of being a mom.  You were this tiny person, with so much potential, and it is my job to help you become the best Grace!  And as the song says, "If you only knew what the future holds..." I started to choke up.  Because like a firework, all that you will be is inside of you just waiting to be released.  I know I have an important job!  I know I will love whoever you are.  And I know you will shine "brighter than the moon."  Love, Mom.


Inside the page protector that houses this page, I also placed a copy of the song as well as a printout of the words.  I hope she understands just how much the song means to me and that someday, when she is an adolescent and maybe we're not as close as I'd like, she can find her own meaning in the song.  


Well, thanks for letting me share.  I will be at a crop all day tomorrow :) so I will post again on Sunday.  Have a great weekend!

Thursday, March 22, 2012

Bring out your Inner Artist--with Watercolors!

Growing up I always thought I was an awful artist.  I thought art meant drawing, and I was no good at that!  My stick figures always had one arm longer than the other, or they towered over the houses they were supposed to live in.  I know now that it's because of my poor depth perception that I can't draw.  (This "diagnosis" was made by my high school shop teacher.  Sorry again about that hole in the table!)  Bad depth perception is why I can't parallel park, why geometry TERRIFIES me, and why I cannot for the life of me judge space between cars and I'm always that person holding up traffic waiting to make a left (sorry!)  Basically, my left brain works and my right brain is taking a snooze!


Imagine my surprise when I discovered that scrapbooking is not as much art as it is a mathematical equation about balance.  Picture on left + Picture on right = Balance!  A person like me really benefits from a sketch because the balancing act is already done!  As I have gained confidence with the basics, I have begun to experiment with some different techniques.  I have also learned to let up on the Type A a little bit!


Having recently discovered my love for all things artistic, I wanted to start early with my daughter.  So I broke out the watercolors and let her go wild (well as wild as a Type A mom can!)  And of course I had to record the momentous occasion!

I wanted the layout to have a museum feel to it, and I have seen a lot of "doodle frames" on other layouts, so I decided to give it a try.  Doodling isn't the same as drawing, right?!  


 So I drew 4 doodle frames with pencil around a square the size of my pictures.  Then I used regular Crayola watercolors to paint them.  I wasn't going for perfection here.  I was going for the Dr. Seuss look.
 To make the frames look like they were hanging on a wall I twisted some jewelry wire into a loop and taped it to the back of each.  Then I adhered the frames to my card stock using foam dots.


My inspiration for this particular page came from the awesome Picaso quote in the center.  I found the quote through, where else, Pinterest.  Here is the link for this and other awesome printables.  


http://www.kimberlykalil.com/p/printables.html


I hope more than anything my daughter grows up thinking she is good at whatever she tries to do, and that she has the confidence to challenge herself creatively.  And I hope she learns to do so before the age of 31!  And I hope I have inspired you to break out the old watercolors and have some fun!  Until next time...

Wednesday, March 21, 2012

Feeling Spring-y!

Here in Cape Cod the mildest winter in the history of EVER has been followed by the most beautiful start to Spring I can ever remember.  Everywhere I looked on this 70 degree day there were people walking dogs or playing at the park.  If I were a teacher this year I would be fighting with the kids to pay attention to me and not the pretty bird out the window or the custodian mowing the lawn (things they would never notice while playing video games!)


This beautiful weather has me making mental lists of all the outdoorsy places I want to take my daughter now that she's old enough to appreciate it.  Last year at this time I was waddling around 8 months pregnant complaining about how hot it was!  This year I have an almost-toddler who I want to share the whole world with!


Warm weather makes me want to scrapbook with FUN colors too.  I've had this awesome Echo Park "Country Drive" pack for a month just waiting for an opportunity to use it!


And here it is!  My daughter loves blowing raspberries so much.  When she LOOKS at this picture on my desktop she starts blowing them to the picture!  Too cute!

So my goal in this layout was to focus on these pretty colors.  I kept the overall layout pretty simple.  I hand cut some large scallops and used a 3/4 inch circle punch to punch 5 holes from each.  Then I backed each with a 1 inch circle.  I inked the edges of each piece to give them definition.

I had a lot of pictures to choose from (as I often do!) so I used Picasa, a free program that you can download through Google, to create a 5x7 collage with my favorites.  This makes it so much easier to scrap a bunch of pictures at once, leaving time to create extras!


My very favorite parts of the layout are the title, which was created by layering two of the same die cut letters to create a shadow effect:

and the rosettes, which are marked with a G and a D for Grace and Daddy!

That's all folks!  Thanks for stopping by!  See you next time.
Tuesday, March 20, 2012

Monkey Love

Yup that's right.  Monkey Love!


My husband and I have been married for nearly 5 years now.  But back in 2005 when we were dating, the first gift he ever gave me was a stuffed monkey.  And since he is in the Coast Guard and would go away for long periods of time, this monkey would get loved and hugged as I pined for my honey.


Fast forward 7 years.  When I saw my daughter cuddling with the monkey I just knew it was a scrappable moment so I ran and grabbed the camera!  At only 10 and a half months she knows her job is to ham it up when mommy is holding the camera!


I knew I wanted to use this awesome turquoise color combined with brown.  The turquoise comes from a Colorbok paper pack I got for 5 bucks at Walmart (yay!) and the brown is a Bo Bunny paper patterned with flourishes.  I had to convert the photos to black and white because my daughter's hideous green pajamas clashed horribly.  But I really like the way the B & W adds drama.


This page is basically straightforward and follows the Thirds Rule: if my 12 x 12 sheet were a Tic Tac Toe board, my important elements such as photos and title are in places where the lines intersect.  The ribbon was a scrap piece that came with my cat's new bed (score, free ribbon!) and the letters are Thickers.  The little heart embellishment was another Walmart find.


The difficulty came in when I tried to add the stitching around the photo mat.  It took 2 days to finish because it just kept tangling up every time I tried to make a stitch!  But I am not one to let something else win so I kept at it.  Overall I am pretty happy with how it turned out.


Well, that's it for my second-ever blog post!  I hope you check back soon for another project.  I will be posting one of my favorite pages so far with a yummy raspberry pink and green color combo.


Thanks for stopping by!

Monday, March 19, 2012

My First Post!

If you are reading this post you are either a Facebook friend who was curious when I said I started a blog, or you stumbled across it through Pinterest or somewhere else in the big wide web world.  Either way, I hope you'll see something you like and want to try yourself!


I started a blog, not because I want to gain fame or recognition for my craft, but because sometimes I create things that I'm so excited about it seems unfair to trap them inside a 12 x 12 page protector.  As a former teacher, I'd love to share my creations and how I made them in the hopes that I may help a fellow crafter.  One of my favorite things to do when my daughter is napping is to visit the looooonnnnnggggg list of blogs in my favorites and Pin the hundreds of ideas I'll never in a million years have time to create, especially if I sit on the computer searching blogs!  So here is yet another crafting blog.  I hope you like it!


The first project I want to share on my blog is one I was pretty excited about!  It started with a Pinterest Inspiration.  I will post the original project if I can find its original source.  But here is mine:


Those pictures of my daughter were WAAAAYYYY too cute and I had to make something with them as soon as I saw them.  I dragged them into Microsoft Word (my favorite computer program!) and put a cute little border around them to save time on matting.


Next I made a 9 inch diameter circle by tracing one of my kitchen plates onto a piece of scrap card stock.  I used my paper trimmer to trim a 10 x 10 square around the circle template.  Then I lined up, in neat little rows, 1 x 1 squares of paper that I also cut with my paper trimmer.  (You could use a paper punch, but where's the fun in that?! ) Be sure to line them up on the side that does NOT have the circle drawn, because you will need the circle as a guide.  The paper I used was mostly old stuff I had in my stash EXCEPT for one sheet of Bazzil (the embossed aqua) and one sheet of Bella Blvd - Mother's Day (the yellow AND the flowers). 

I stitched some buttons on randomly, then added some fussy-cut flowers from the Bella paper.  Then I cut the letters for the title out on my Sizzix using a Die-namics letter die.  Because I wanted the title to stand out I outlined it in brown marker (a Sharpie).


I put it all together and Viola!  A Spring-y Happy layout that doubles as a Home Decor piece!


That's all for now!  I hope you'll check back soon and see what I create next.